For better performance nowadays instead of using a hard disk drive people prefer using a solid-state drive popularly known as SSD. If you two are looking for ways to clone operating systems from hard disk to SSD here you go.

In this blog post, we will be explaining how to clone the system drive to SSD.
Why Clone System Drive to SSD?
Over the years hard disks have dominated computer systems. But with the popularity of SSD, the scenario is now changing. Given that if you’re looking for great performance, glitch-free working on a Windows system replacing a hard disk with an SSD without reinstalling Windows is the best way.
For this many people look for ways to clone their hard disk. However, since the capacity of a hard disk is much bigger than an SSD, many users instead of cloning the whole HDD to SSD decided to clone only the operating system.
But manually cloning an operating system from a hard disk to SSD is not possible. Therefore, to clone an operating system to a new SSD, we will need disk cloning software for windows system. For this, we suggest trying the EaseUs partition manager.
Using this product in no time you can manage the disk space and can even clone OS from hard disk to SSD so without any further delay let us learn how to.
Also Read: 7 Deadly Data Backup Mistakes to Avoid
How to clone Operating System to New SSD?
For smooth cloning of OS from HDD to SSD choosing a good cloning software is a must. To make things easy we suggest using the EaseUS Partition Manager a professional Windows partition manager that helps clone system drive to SSD.
Here’s how to use this system clone software and move the operating system to a new SSD.
Prerequisite for cloning OS to SSD
- A SATA cable to connect the SSD to the PC
- Obviously an SSD drive
- EaseUS Partition Master
Once the above things are gathered and you have EaseUS Partition Manager installed, it is time to prepare the SSD.
Initializing SSD
Attach the SSD into the SATA-to-USB adapter, and connect it to the PC.
Note:- If it is a brand new drive, you need to initialize. To do so, press Window + X > select Disk Management. You’ll be prompted to initialize the SSD, you can do it using either the GPT or MBR partition table.
What is MBR and GPT partition style?
On Windows MBR and GPT are two popular partitions styles, they tell Windows how to access data on the disk.
MBR – Master Boot Record, named after the boot sector located at the very beginning of a drive was introduced with IBM PC DOS 2.0. It is the oldest partition style.
GPT – GUID Partition Table, is the newer standard and is flexible. It has better compatibility with modern hardware.
Both these partition styles use different boot modes (BIOS and UEFI). Therefore, to clone SSD properly keep the SSD partition style similar to the source disk before cloning.
To check the partition style of your SSD open Disk Management > right-click HDD > Properties > Volumes tab > here you can see the partition style.
In case the partition style is a mismatch you can use EaseUS Partition Master to convert the partition style.
Capacity of SSD
The storage capacity of SSD capacity should be more than the space used on your system. This is necessary due to following reasons:
- If there’s a shortage of free space you will have to delete the existing partition to make room for moving OS to SSD.
With that being said, if the unallocated space is not enough in the front of the SSD, using EaseUS Partition Master you can create space and move it forward. Moreover, EaseUs Partition Manager is capable of deleting existing partition this ensure you have enough space to clone the operating system.
Once all the above things are in place, it is time to use EaseUs Partition Manager.
Here’s a step by step guide to using EaseUS Partition Manager
Note: When there’s is a shortage of unallocated space on the target disk, migrating the operating system from HDD to SSD will delete existing partitions and data from the target disk. Therefore, to be on the safe side always take a backup of important data.
After taking the backup follow the steps to move OS to SSD from HDD.
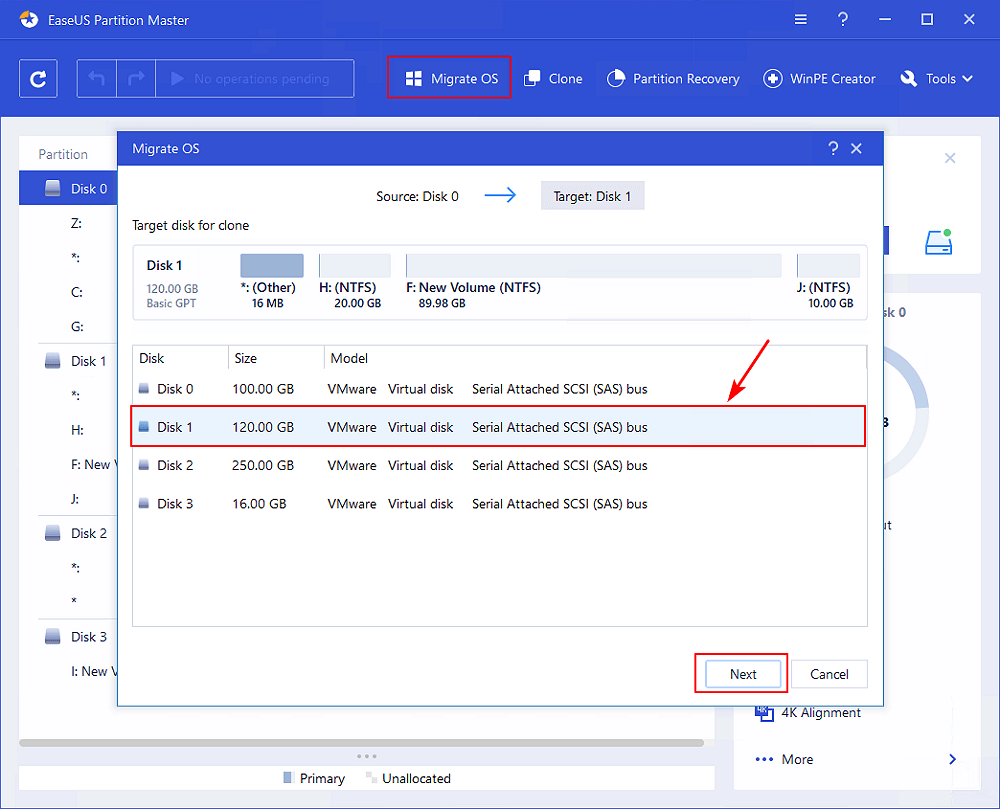
Step 1. Launch EaseUS Partition Manager and select “Migrate OS” from the top menu. Select the SSD or as the destination, disk > Next.

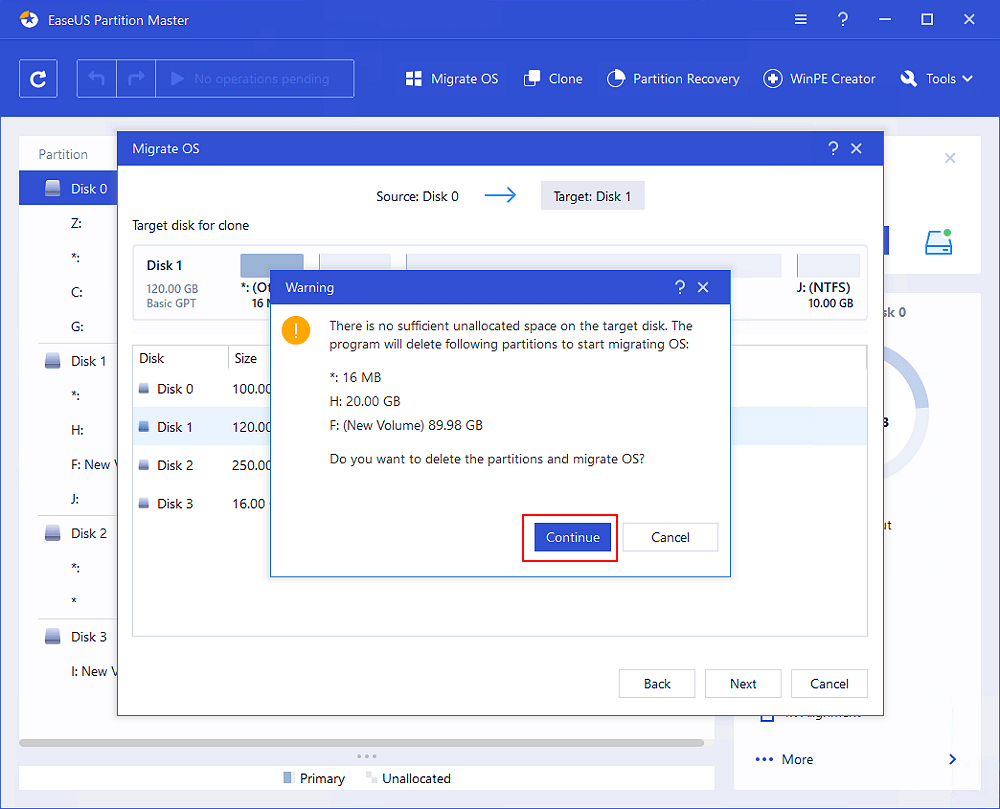
Step 2. You will now get a warning message, read it carefully, and click Continue. The message notifies you about the removal of the data from the partitions on the target disk. Make sure you have the backup as once the data gets overwritten chances of getting it back are very thin.

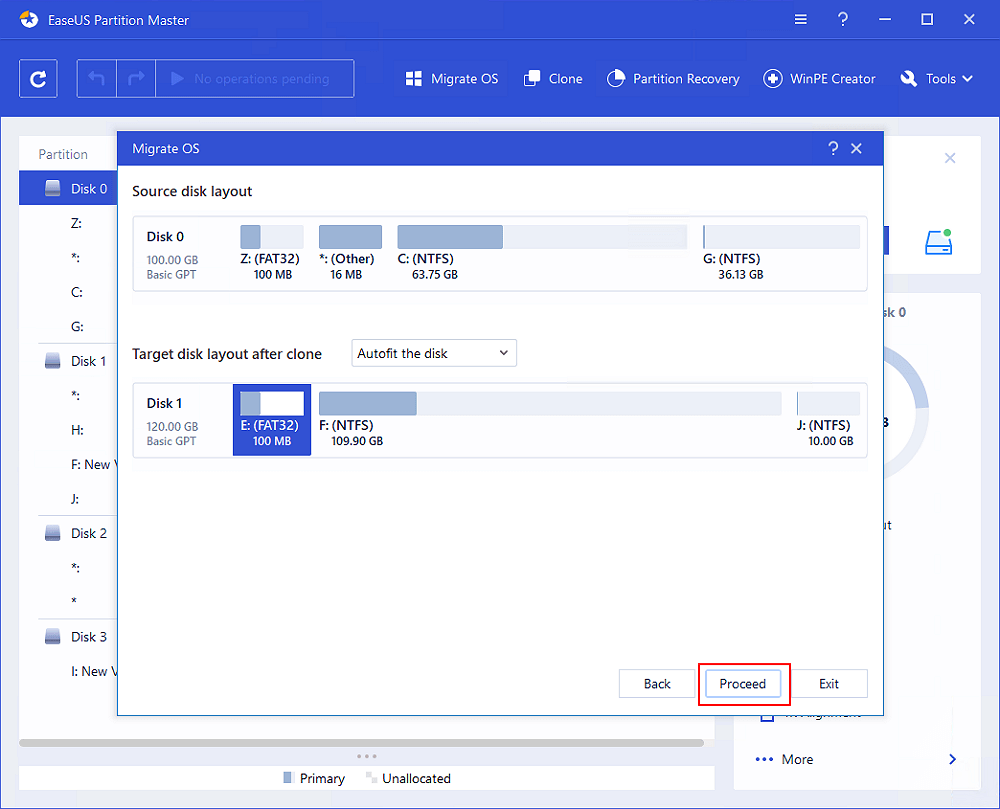
Step 3. Preview the layout of your target disk. To get more layout options click disk layout > customize the layout to clone operating system and click Proceed.

That’s it using these simple steps you can clone the system drive to SSD.
Now that the OS is moved to SSD you need to change the boot order in BIOS and set the installed SSD as the boot drive boot up the PC from the SSD.
Also Read: How to Remove Unwanted Programs From Windows 10?
The Bottom Line
Cloning the OS from HDD to SSD with the help of third-party software makes things easy. The only thing you need to keep in mind is that the SSD should meet the requirements of a successful cloning process.